
For businesses selling complex, customized solutions, end-to-end product configuration is an approach that can drastically reduce cost and lead-time while improving quality.
However, for products that are complex, each order could involve some tailoring that is impossible to prepare in advance. The tailoring could be an adjustment for specific application parameters, specific technical requirements, or geometrical constraints. In such a situation, for the end-to-end configuration process to work, a portion of the solution must be designed for the specific order.
Design automation uses a CAD system to automatically generate new components and/or assemblies. It is used to save design resources, reduce the time needed to produce a drawing, or to ensure consistent quality of the design. Imagine the sales process of a customized product that must be fully specified, including a CAD-model and exact price, before winning the contract. If we can generate these full specifications faster, with less resource bottlenecks and assurance of the results, we can reduce the RFP/RFQ response time drastically.

What is Design Automation?
In short, design automation is the process of driving certain elements of a design by measurable properties – parameters. By implementing design automation, the design is created once, and as the need for new design variants occurs, the values of the parameters are changed rather than manually redoing the design.
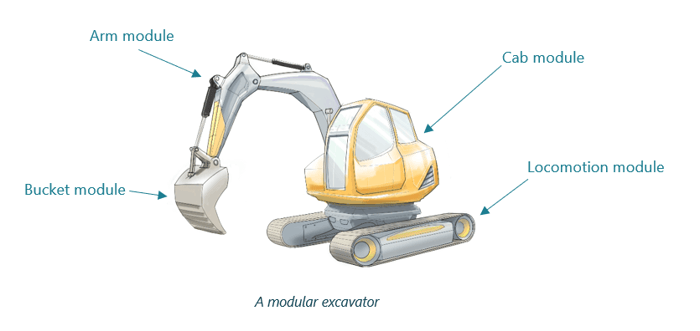
Design automation can be applied on all levels of a design. From part-level, where individual measurements are controlled to govern the dimension of a certain part, to assembly-level, where configuration rules are parameterized to control the occurrence and positioning of the parts that make up the product. In this post, I will show some examples of how design automation is utilized in different situations and what benefits are achieved. These examples are derived from an imaginary excavator product platform that is described in the figure below using four modules.
Design Automation on Part Level
First, we will look at how design automation can be used on part level. For an excavator, it is likely that the tool module has a wide range of variants to cater for specific application-related needs. Let’s have a look at how the demand coming from the customer affects the need for bucket variance and how we can parameterize the design of the bucket.
Product properties
When defining what performance level the product platform needs, it turns out that the bucket is affected by the product property tonnage capacity. This is the amount of raw material that the excavator can move per hour – perhaps the most significant way to measure the outcome of the product. Demands from customers vary depending on the application, and consequently, tonnage capacity will drive variants at the product level.
To control how the product fulfills the tonnage capacity, we create a second product property called bucket volume – the inner volume of the bucket. This property will define how much material can be handled in each dig and, together with properties like hydraulic capacity, arm length etc., dictates the tonnage capacity of the machine.
To make use of a product property in driving a design, we need to assign goal values to the property. An analysis of the product variance shows that we should offer two values: 200 l and 500 l
.png?width=330&name=Picture%202%20(1).png)
Design parameters
Product properties and module variants are defined during the creation of product architecture, and it is up to the designers to interpret how goal values are realized through the design of module variants.
In this case, the designer finds that one simple way of creating variants of the volume is to alter the width of the bucket. This way, the design of the side pieces, lifting hinges etc. are kept unchanged for different volumes. This is very practical. It not only reuses designs, but it also enables reuse of the welding jigs during manufacturing. The width is a measurable attribute that is defined by a single parameter. We have now defined bucket width as a design parameter.
.png?width=457&name=Picture%203%20(1).png)
The designer will now be able to use parameters to control the CAD model of the bucket. All the needed variants are created by assigning a value to this parameter. When new applications change the needed bucket volume, all we need to do is to set the bucket width parameter, and the new CAD model will be created automatically.
Design Automation on Assembly Level
Let’s raise our point of view to the level of a complete product. We have already established that the product platform consists of four modules. A schematic assembly model looks like this:
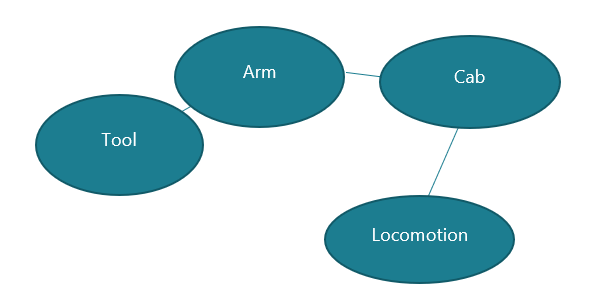
This generic model mirrors the product architecture or the modular Bill of Material (BOM). We call this the Architectural Model and it is built as a CAD assembly. Using this, we can automate the creation of product models by parameterizing the population of the nodes in the architecture model.
Previously, we looked at the product property of tonnage capacity and how it affected part level automation. We concluded that the bucket would have two variants, with different internal volume, to address the goal values of the bucket volume product property.
In addition to bucket volume, tonnage capacity also affects the arm length. In this example, let’s say two variants are needed, 4 m and 6 m.
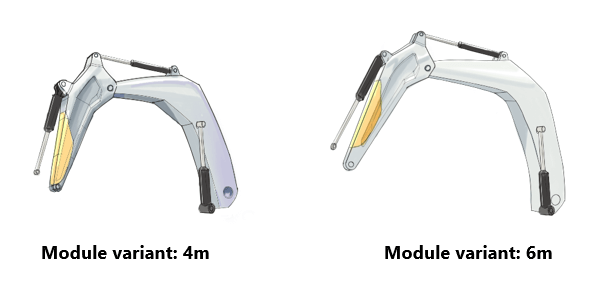
In a similar fashion to how the bucket part design was automated, we can assume that the Arm Module CAD models are created to allow the arm length to be controlled through parameterization. Arm length is a third product property that controls this parameter.
In the architectural CAD assembly, by applying parameters to each part node, it is possible to build assemblies of the excavator – product configurations – by controlling the values of the parameters.
The table below shows the different modules, the parameters that controls them and the respective module variant assigned to each parameter goal value.
.png?width=653&name=Picture%206%20(2).png)
This saves time and ensures that the customer gets the product they request. The image below showcases what product configurations can be created depending on how parameters are set.
.png?width=717&name=Picture%207%20(1).png)
Combining Part- and Assembly Level Design Automation
A key strength of design automation is that the same set of product properties can control both part and assembly level designs.
As previously stated, the property that triggers the need for product variants is tonnage capacity, however in the table above, the bucket and arm design is govern by bucket volume and arm length. Which of these product properties should link the requirement to the design?
The answer is both. From a product management point of view, it is logical to use product properties that have a clear connection to a customer value – tonnage capacity corresponds to a specific customer need. The customer requests a product that fulfills a certain capacity specification but cares less about how the bucket and arm are designed. However, as we have seen, the properties bucket volume and arm length have a very logical connection to both part and assembly design and should be used to drive the design.
By setting up product configuration so that the goal values of tonnage capacity are linked to combinations of goal values for bucket volume and arm length, we can automate the design of part and product assemblies. The table below shows how choosing a certain value of tonnage capacity is linked to the requirement specification.
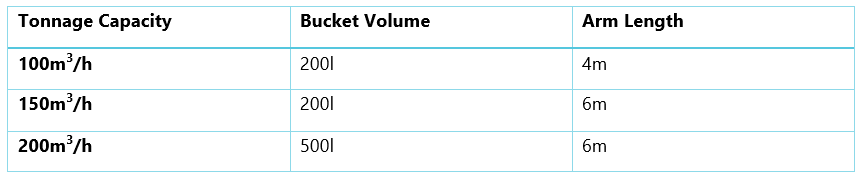
As we can see, three goal values of tonnage capacity has been identified and linked to three combinations of module variants for buckets and arms. The fourth possible combination (large bucket and short arm), according to the configuration rules, is not viable.
We have now set up design automation rules that drive the assembly design.
When it comes to part design, we did state that bucket volume itself is a product property that drives the design parameter bucket width. Bucket width corresponds directly to a design feature on the bucket and needs to be defined in the part design (the bucket needs a width). This enables it to be handled in the CAD system. Bucket volume, however, is not corresponding directly to a specific feature in the design. Instead, it is the result of several features (length, height, and width) and should therefore be handled in the product configurator. It also better describes the whole part and is better suited to drive the assembly level design automation.
By adding a layer of design parameters underneath the product properties, we can now drive both assembly and part design using tonnage capacity (see below). The arrows show how the customer input of tonnage capacity controls the part and assembly design.
.png?width=751&name=Picture%209%20(2).png)
Relations Between Product Properties
The figure below displays the relation between customer and design through the product properties.
.png?width=701&name=Picture%2010%20(1).png)
As we can see, bucket volume is the link between direct design properties and customer product properties. At its current state, you might ask yourself if it would be easier to just skip bucket volume and let tonnage capacity drive bucket width. The benefit of collecting design parameters into a middle layer like this is that bucket volume can be used to drive additional design parameters such as bucket length and bucket height.
.png?width=710&name=Picture%2011%20(1).png)
Creating this middle layer allows you to manage the information where it is best suited.
- The product configurator deals with customer values and how the product should be designed on a high level to achieve what the customer wants. Why is more important than how.
- The design side deals with breaking down the demands from the architecture to a concrete product design, this side deals with solving the how but do not care for the why.
The team that creates the architecture knows what the customer wants and can interpret this to high level product requirements. However, they do not have the expertise to interpret this into detailed design. The middle step is used to link the understanding of both departments and functions.
To Achieve Efficient End-to-End Configuration the Back End Must be as Flexible as the Front End
In this blog post, I have introduced design automation as a concept to enable automatic design of the customizations of a complex configurab.png?width=756&name=Picture%2012%20(1).png) le product. For companies marketing customized products in front-end sales, it is critical to handle these customizations efficiently in back-end processes and systems. If the back-end processes are working manually with fixed BOMs, they will soon be overwhelmed and limit the capacity of the business.
le product. For companies marketing customized products in front-end sales, it is critical to handle these customizations efficiently in back-end processes and systems. If the back-end processes are working manually with fixed BOMs, they will soon be overwhelmed and limit the capacity of the business.

Want to know more?
If you found this topic interesting and want to know more about how we at Modular Management work with Design Automation and how we have helped other companies, please contact me directly and I'm happy to set up a meeting to further the conversation.
 AUTHOR
Oscar Strömberg
Consultant
+46-73-620 11 34
oscar.stromberg@modularmanagement.com